(Activity time: about 90 minutes)
(Download the Day Three Files Here)
Previous posts:
Game Jam Day 1
Game Jam Day 2
Intro
Hello, and welcome to day 3 of the Dad and Daughter Quarantine Game Jam Tutorial!
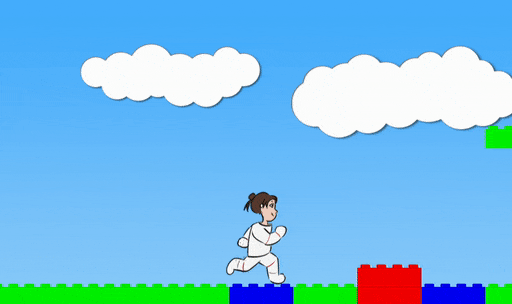
We’re making a game called Mia’s Daring Escape. On day 1, we set up the game and put Mia on the screen. On day 2, we gave Mia a brick level to run, and a jumping skill.

Today we’re add falling bricks and death and stuff.
First Task: Falling bricks!
We begin where we left off yesterday. You can use the files you already have, or download the day three files and start from there. The day three files have today’s code changes to help you if you get lost.
We’re going to make a new function called dropBricks which drops a brick every 0.25 seconds.
Let’s start by making an empty function. Add this to your code:
// Keep Mia roughly in the center of the screen by using a tracker
// which stays within 100 pixels of Mia, and then moving the whole stage
// so that the tracker stays in the center of the screen.
function followMia() {

  if (mia.x - tracker > 100) {
    tracker = mia.x - 100;
  }

  if (tracker - mia.x > 100) {
    tracker = mia.x + 100;
  }

  stage.x = (game_width / 2 - tracker);
}


// Every 250 milliseconds, drop a brick.
function dropBricks() {

}


function updateGame(diff) {

  // Don't try to update the game until we've created Mia,
  // or the game will crash.
  if (mia == null) return;

  dropBricks();

  // If the right key got pushed, move Mia to the right
  if (key_down["ArrowRight"]) {
    mia.x = mia.x + 7;
    mia.scale.set(1,1);
  }

  // If the left key got pushed, move Mia to the left
  if (key_down["ArrowLeft"]) {
    mia.x = mia.x - 7;
    mia.scale.set(-1,1);
  }
...
...
...
We have an empty function, and it gets called from updateGame (so, about 60 times a second).
It’s time to learn about time.
Whatever happens in dropBricks, we want don’t want it to happen on every frame. We only want it to happen every 250 milliseconds.
In javascript, you can call a function called Date.now() to get the current time. What you get back is a weird large number, but it doesn’t matter, because if you call it two seconds later, you get a number which is 2000 milliseconds larger:
first_time = Date.now()
...
...
// do stuff for 2 seconds
...
...
second_time = Date.now
difference = second_time - first_time
// difference will be 2000
Detail: The number you get from Date.now() is the number of milliseconds elapsed since January 1, 1970. This is sort of a standard across all computers for reckoning the current time. I can send this number to a server on the other side of the world, and we’ll both agree on what it means.
Let’s add a variable to track the last time we dropped a brick, and let’s put it at the top of the code:
let mia = null;
let bricks = [];
let colors = [
  color(1,0,0), // Red
  color(0,1,0), // Green
  color(0,0,1), // Blue
]

let tracker = 0;

let last_brick = Date.now();


function initializeGame() {

  for (num = -1; num < 8; num += 1) {
    let blue_sky = makeSprite("Art/blue_sky.png");
    blue_sky.position.set(game_width * num, 0);
    stage.addChild(blue_sky);
  }
...
...
...
Then, let’s add this code inside the dropBricks function:
// Every 250 milliseconds, drop a brick.
function dropBricks() {
  if (Date.now() - last_brick > 250) {

    console.log(last_brick + " cookies")
    last_brick = Date.now();

  }
}
We take the time right now and subtract the last brick drop time. If the answer is more than 250, then enough time has passed. For now, we just print “359072350987345 cookies” or whatever the time value is.
Then, we set the last brick drop time to right now, so that in 250 more milliseconds, this stuff will happen again.
When you run this code, press Command-Option-J on a Mac or Ctrl-Shift-J on Windows to bring up the debug console. (Edit: it’s Command-Option-I on a Mac. I use a Mac. I don’t know why I got this wrong)
We’re using console.log, a function that prints things to the debug console.
We want to see if that code prints something a few times a second.
Sorry if you already know this, but milliseconds are tiny bits of time. 1000 milliseconds is one second, so 250 milliseconds is a quarter of a second.
With the debug console open, you should see something like this:
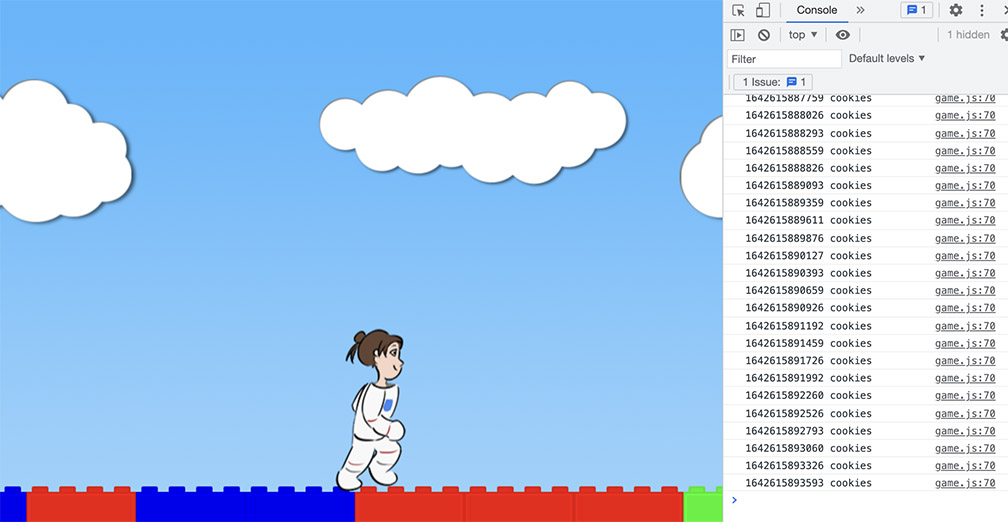
Every quarter of a second, the program prints out the next number of cookies. If you subtracted two numbers in a row, the answer should be about 250. It’s not exact, because the computer can’t guarantee it will take the same exact amount of time between frames. But it’s close enough for our purposes.
Detail: Yes, computers in general can guarantee exact times at much smaller fractions of a second, but it takes extra work, and it’s typically not worth the trouble for making games.
If that 250 millisecond delay is working, let’s add the actual brick drop code:
// Every 250 milliseconds, drop a brick.
function dropBricks() {
  if (Date.now() - last_brick > 250) {

    console.log(last_brick + " cookies")
    last_brick = Date.now();

  }

  if (Date.now() - last_brick > 250) {

    // Make a new brick
    let brick = makeSprite("Art/brick.png");
    brick.anchor.set(0.5,1);
    brick.tint = pick(colors);

    // Set it in the right place and give it some drop speed.
    brick.column = dice(70);
    brick.position.set(120 * brick.column, -50);
    brick.y_velocity = 1;

    // Add it to the stage, and add it to the list of bricks.
    stage.addChild(brick);
    bricks.push(brick);

    last_brick = Date.now();
  }

  // For every brick, if it has y_velocity, drop it.
  for (i = 0; i < bricks.length; i += 1) {
    let brick = bricks[i];

    if (brick.y_velocity > 0) {
      brick.y = brick.y + brick.y_velocity;
      brick.y_velocity = brick.y_velocity + 0.25;
    }
  }
}
Is this a good amount of brick droppage? Try setting the time delay to 25 milliseconds instead!
Too much! Too much! Go back!
Okay. So. Here are some things to note about the code:
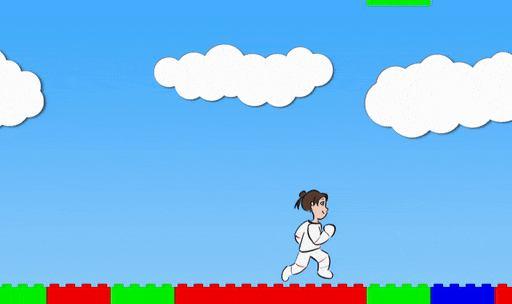
We start the new bricks with a y position of -50. That’s above the top of the screen. We do this so that the bricks won’t be visible when they pop into existence.
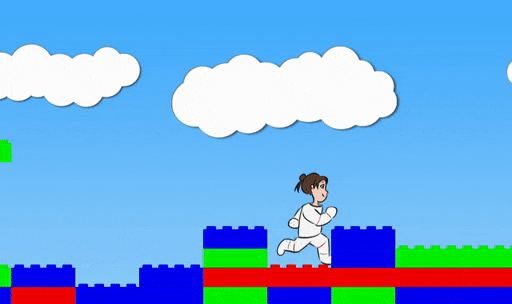
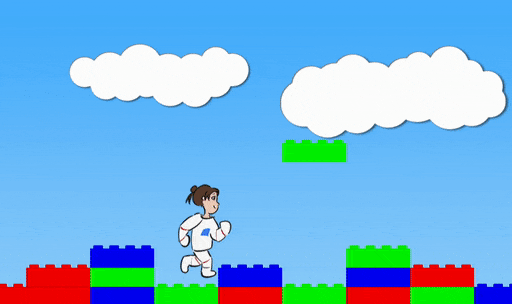
We’ve given every brick a “column” value, because once the bricks start stacking up, we’re going to need to keep track of which column we’re working with:
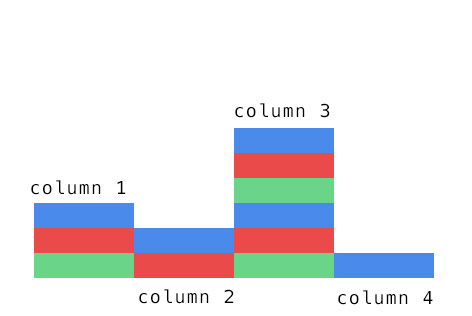
To make things convenient for ourselves, we’re only going to line up all the brick drops so that each new brick goes into a specific column. No overlaps.
Detail: Yes, I know you would never build like this with your *cough* plastic bricks *cough*. Very unstable. But very easy to program.
In plumbing.js, I’ve added a function called dice which rolls a dice of whatever size you give it. Give it dice(10), it will roll for a random number between 1 and 10. Give it dice(70), it will roll for a random number between 1 and 70.
Since our old brick making loop went from -8 to 70, there are negative columns. We’re going to ignore these, and roll the dice on the 70 positive columns.
Each new brick gets assigned to a column. We set the brick’s x position to 120 * column.
In the second part of the code, we do a loop, but instead of looping on a number, we loop the list.
for (i = 0; i < bricks.length; i += 1) {
  let brick = bricks[i];

  ...
  ...
  ...
}
This loop command says “go through all the bricks in the list, and do the code in { } curly braces once for each thing.”
The first thing we do inside that loop is “let brick = bricks[i]”.
That just means “make a temporary variable for the current item in the list”.
We loop over every brick in the list, and if the brick has y velocity, we drop it.
Now we want to add brick stacking. To stack the bricks, we just need to keep track of columns, and convert a falling brick to a stacked brick at the right time.
Let’s add a variable that tracks each of the stacks:
let mia = null;
let bricks = [];
let stacks = {};
let colors = [
  color(1,0,0), // Red
  color(0,1,0), // Green
  color(0,0,1), // Blue
]

let tracker = 0;

let last_brick = Date.now();
...
...
...
Note the curly braces.
Bricks is a list (bananas, oranges, apples).
Stacks is a dictionary (bananas: 3, oranges: 17, apples: 5).
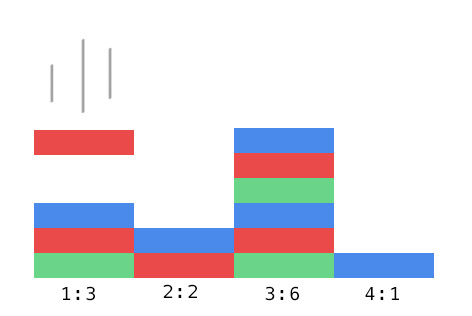
Looking back at the column diagram,
The dictionary for these columns would look like this:
{
  1: 3,
  2: 2,
  3: 6,
  4: 1
}
Now let’s make sure that our original floor of bricks correspond to columns, and that they have y velocity of 0:
function initializeGame() {

  for (num = -1; num < 8; num += 1) {
    let blue_sky = makeSprite("Art/blue_sky.png");
    blue_sky.position.set(game_width * num, 0);
    stage.addChild(blue_sky);
  }

  for (num = -8; num < 70; num += 1) {
    let brick = makeSprite("Art/brick.png");
    brick.anchor.set(0.5,1);
    brick.position.set(120 * num, game_height);
    brick.tint = pick(colors);
    stage.addChild(brick);
    bricks.push(brick);

    brick.column = num;
    brick.y_velocity = 0;
    stacks[brick.column] = 1;
  }

  mia = makeAnimatedSprite("Art/mia_animations.json", "run");
  mia.anchor.set(0.5, 0.9);
  mia.position.set(200, game_height - 40);
  stage.addChild(mia);
  mia.animationSpeed = 0.3;
  mia.play();
  mia.state = "running";
  mia.y_velocity = 0;
}
We give each brick a column number, then set the y velocity to 0 (meaning these bricks aren’t falling), then we set the stack height for that column to 1.
That means, at the start of the game, all the stacks are at a height of 1 brick.
To finish brick stacking, we just need to go back to where the bricks are falling, check when they’ve landed, stop them, and change the stack height:
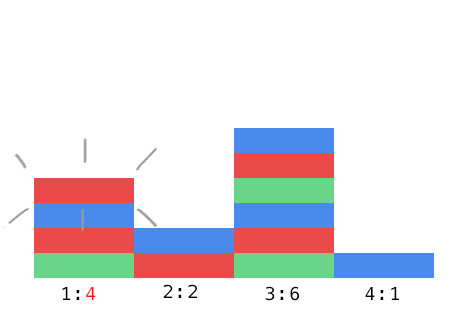
Add this code to dropBricks:
// Every 250 milliseconds, drop a brick.
function dropBricks() {

  if (Date.now() - last_brick > 250) {

    // Make a new brick
    let brick = makeSprite("Art/brick.png");
    brick.anchor.set(0.5,1);
    brick.tint = pick(colors);

    // Set it in the right place and give it some drop speed.
    brick.column = dice(70);
    brick.position.set(120 * brick.column, -50);
    brick.y_velocity = 1;

    // Add it to the stage, and add it to the list of bricks.
    stage.addChild(brick);
    bricks.push(brick);

    last_brick = Date.now();
  }

  // For every brick, if it has y_velocity, drop it.
  for (i = 0; i < bricks.length; i += 1) {
    let brick = bricks[i];

    if (brick.y_velocity > 0) {
      brick.y = brick.y + brick.y_velocity;
      brick.y_velocity = brick.y_velocity + 0.25;

      // If it goes past the brick stack, stop it,
      // and increase the stack value.
      if (brick.y >= game_height - 36 * stacks[brick.column]) {
        brick.y = game_height - 36 * stacks[brick.column];
        brick.y_velocity = 0;
        stacks[brick.column] = stacks[brick.column] + 1;
      }
    }
  }
}
Each brick is 36 pixels tall, so to check when a falling brick has hit the ground, we see if the y value is greater than (game_height – 36 * stack height).
We stop the fall by setting y velocity to 0, and add 1 to the stack height.
Wheeee!
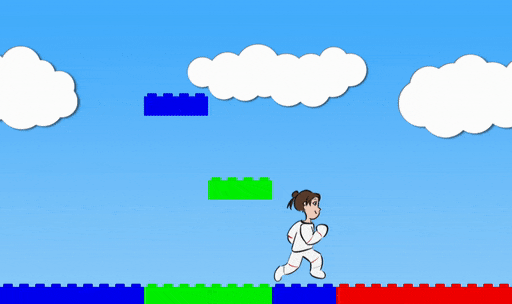
Second Task: Help Mia stand on bricks!
Next, we’re going to make Mia stand on the bricks.
Remember when we added jumping, we gave Mia two states that she could be in: running or jumping. We’re going to add third and fourth states: falling, and kaput. Falling is when Mia is moving downwards, and kaput is when she gets bopped by a brick.
We’re adding a new function called testBricks. This function will check all of Mia’s interactions with the bricks.
For starters, let’s just make an empty function, and the new falling state:
// Every 250 milliseconds, drop a brick.
function dropBricks() {
  ...
  ...
  ...
}


function testBricks() {

}


function updateGame(diff) {

  ...
  ...

  // If the space bar got pushed, make Mia jump
  if (key_down[" "] && mia.state == "running") {
    mia.state = "jumping";
    mia.y_velocity = -20;
  }

  // If Mia is jumping, move her upwards, use gravity to pull her downwards,
  // and if she reaches the ground, stop the jump.
  if (mia.state == "jumping") {
  if (mia.state == "jumping" || mia.state == "falling") {
    mia.y = mia.y + mia.y_velocity;
    mia.y_velocity = mia.y_velocity + 0.8;
    if (mia.y > game_height - 40) {
      mia.y = game_height - 40;
      mia.y_velocity = 0;
      mia.state = "running";
    }

    if (mia.y_velocity > 0 && mia.state == "jumping") {
      // switch to falling
      mia.state = "falling";
    }
  }

  testBricks();

  followMia();
}
The game should look the same as before. But inside the code, Mia now switches from jumping to falling when her y velocity goes from negative to positive, and on every frame, we call the testBricks function.
Before we get Mia to stand on the brick stacks, we’re also going to have to remove our old landing code.
Delete this stuff:
function updateGame(diff) {

  ...
  ...

  // If the space bar got pushed, make Mia jump
  if (key_down[" "] && mia.state == "running") {
    mia.state = "jumping";
    mia.y_velocity = -20;
  }

  // If Mia is jumping, move her upwards, use gravity to pull her downwards,
  // and if she reaches the ground, stop the jump.
  if (mia.state == "jumping" || mia.state == "falling") {
    mia.y = mia.y + mia.y_velocity;
    mia.y_velocity = mia.y_velocity + 0.8;
    if (mia.y > game_height - 40) {
      mia.y = game_height - 40;
      mia.y_velocity = 0;
      mia.state = "running";
    }

    if (mia.y_velocity > 0 && mia.state == "jumping") {
      // switch to falling
      mia.state = "falling";
    }
  }

  testBricks();

  followMia();
}
Now Mia falls right through the floor, and to fix that, we will write the code for testBricks.
Here’s how testBricks works:
First, we do some math to figure out which column Mia is supposed to be standing on. As Mia runs from left to right, she will cross each column: 0, 1, 2, 3, et cetera.
Second, we do some math to figure out the floor height for that column. Each brick is 36 pixels high. If the column has two bricks, the stack is 2 * 36 pixels high. But we’re starting from the bottom of the screen and going upwards, so it’s game_height – 2 * 36. And we’re also going up by 4 more pixels, because it makes Mia’s footing look slightly better. So the floor height is game_height – brick_number * 36 – 4.
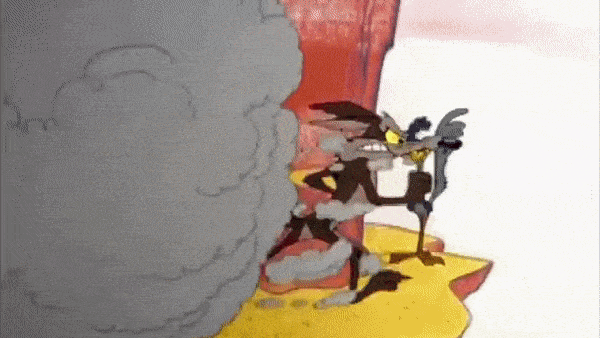
Third, we check if Mia’s y position is way above the floor height. In this case, she’s doing a Wile E Coyote and running over thin air, so we’ll switch her to falling.
Fourth, if Mia is falling and her y position is at or below the floor height, Mia has just landed, and we’ll set her to exactly the floor height, then switch her to running.
Add this code to testBricks:
function testBricks() {

  mia.column = Math.floor((mia.x + 60) / 120);

  // Don't test bricks if Mia is too far to the left or right.
  if (mia.column < -8 || mia.column >= 70) return;

  // Figure out the floor for Mia's current column.
  let floor_height = game_height - 36 * stacks[mia.column] - 4;

  // First, check if Mia has run into thin air,
  // like Wile E Coyote, and make her fall.
  if (mia.y < floor_height) {
    mia.state = "falling"
  }

  // Check if Mia has fallen on top of the current stack.
  if (mia.state == "falling" && mia.y >= floor_height && mia.y_velocity > 0) {
    mia.y = floor_height;
    mia.y_velocity = 0;
    mia.state = "running";
  }
}
There’s a lot of math here.
Don’t worry too much about understanding the code in specific detail. I want you to get the experience of making a game, and learn some programming, not to perfectly understand each piece of what you’re doing and get bogged down.
If the example doesn’t work and you’re getting stuck on bugs, remember that I’ve included example files. The code in game_step_4.js should work. You can copy the testBricks function, or just replace all of game.js with the code in game_step_4.js.
I think the best way to learn the math in game programming is to play with the numbers together and see what changes.
If you pretend the brick height is 46 instead of 36, Mia will stand too high above the bricks, and the higher the stack gets, the worse it will look.
If you get rid of the little -4 adjustment to account for Mia’s foot placement, it’ll mostly look okay, but… slightly off.
The “+ 60” from the column calculation is to offset from the bricks, which are all 120 pixels wide, but positioned at their centers. If you take this out, Mia will only stand correctly on half the brick.
If you change the 120 in the column calculation, you’ll effectively be changing the length of the bricks, so she’ll look like she’s running on a different level.
Whew.
Third Task: Don’t let Mia run through bricks!
To stop Mia from running through the bricks, we need to check every brick in the list, see if Mia is too close to it, and push her back.
For this, we’re going to loop through the brick list again. Add this code to testBricks:
function testBricks() {

  mia.column = Math.floor((mia.x + 60) / 120);

  // Don't test bricks if Mia is too far to the left or right.
  if (mia.column < -8 || mia.column >= 70) return;

  // Figure out the floor for Mia's current column.
  let floor_height = game_height - 36 * stacks[mia.column] - 4;

  // First, check if Mia has run into thin air,
  // like Wile E Coyote, and make her fall.
  if (mia.y < floor_height) {
    mia.state = "falling"
  }

  // Check if Mia has fallen on top of the current stack.
  if (mia.state == "falling" && mia.y >= floor_height && mia.y_velocity > 0) {
    mia.y = floor_height;
    mia.y_velocity = 0;
    mia.state = "running";
  }

  // Then, loop through the whole brick list
  for (i = 0; i < bricks.length; i += 1) {
    let brick = bricks[i];

    // If a brick is not falling, make sure Mia can't run through it.
    if (brick.y_velocity == 0) {

      // Calculate the floor height of this particular brick
      this_brick_floor_height = game_height - 36 * stacks[brick.column] - 4;
      // If Mia is below this brick's floor height, and she's too close
      // to the brick, push her back out.
      if (Math.abs(mia.x - brick.x) < 90 && mia.y > this_brick_floor_height) {
        if (mia.x < brick.x) mia.x = mia.x - 7;
        if (mia.x > brick.x) mia.x = mia.x + 7;
      }
    }
  }
}
We loop through all the bricks in the list. For now, we only check the ones that aren’t falling. For each such brick, we do math to find the floor height of the brick.
Then, if Mia is below the brick’s floor height, and she’s too close to the brick, we push her back out.
Detail: We’re using a function called Math.abs to check the absolute value. Mia’s x position may be larger than the brick’s x position, or it may be smaller, but we just want to see if the difference (positive or negative) is less than 90. So we take the absolute value of the difference; abs(-87) would be less than 90, and abs(87) would also be less than 90.
Why 90? The brick is 60 pixels wide from the center, and Mia is about 30 pixels wide from her center. Using 30+60 = 90 means the outer edge of Mia and the outer edge of the brick will be prevented from crossing.
In truth, Mia is probably just a bit wider than 30 pixels, which means by using 90, I’m letting them cross just a little bit. You can experiment with 80, 85, 90, 95, 100, et cetera, to see what margin of overlap looks best to you.
Finally, note that we check which side of the brick Mia’s on, then push her forwards or backwards depending on the side.
This is starting to look like a game!
Now that we have bricks to jump on, it’s a good time to go back and mess with gravity and jump powers.
In the updateGame function, there’s a line, mia.y_velocity = -20, which sets the intensity of Mia’s jumps.
There’s also a line, mia.y_velocity = mia.y_velocity + 0.8, which sets the strength of gravity.
You can mess with both of those numbers to change Mia’s jump style. If you want this planet to feel like the Moon, try setting the jump to -15 and the gravity to 0.3.
Last Task: Bop Mia on the head with falling bricks!

To give Mia some danger, we’re going to let her fall into pits and get bopped on the head by falling bricks.
Before we do this, let’s talk about if statements.
We’ve written a lot of things in our code like
if (mia.y < floor_height) {
  mia.state = "falling"
}
and these are straight forward if you read them like English language: “if Mia’s y value is less than floor_height, Mia is now falling.”
But we can do much more complicated things with if statements. We can put anything that might be true or false into those ( ) parentheses, and the program will be happy to check, and then run the code if the thing is currently true.
We can put if statements inside other if statements:
if (shirt.color == "blue") {
  print("Found a blue shirt.");
  if (shirt.size = "small") {
    print("Oh hey, it's a small blue shirt.")
  }
}Detail: in most programming languages, the = symbol means “assign a new value”.
x = 5 means “x is now 5”.
The == symbol means “these two different things are equal”.
x == 5 means “the variable x is currently 5, right?”
The != symbol means “these two different things are not equal”
x != 5 means “the variable x is not currently 5, right?”
We can also give the program two different options, like a fork in the road, by using if and else:
if (shirt.color == "blue") {
  print("Nice blue shirt! My favorite!");
} else if (shirt.color == "green") {
  print("Ew, green shirt.");
} else {
  print("Ah, nice shirt.")
}
We’re going to use an if statement to give Mia some danger zones. Add this to the initializeGame function:
function initializeGame() {

  for (num = -1; num < 8; num += 1) {
    let blue_sky = makeSprite("Art/blue_sky.png");
    blue_sky.position.set(game_width * num, 0);
    stage.addChild(blue_sky);
  }

  for (num = -8; num < 70; num += 1) {

    if (num % 16 < 14) {
      let brick = makeSprite("Art/brick.png");
      brick.anchor.set(0.5,1);
      brick.position.set(120 * num, game_height);
      brick.tint = pick(colors);
      stage.addChild(brick);
      bricks.push(brick);

      brick.column = num;
      brick.y_velocity = 0;
      stacks[brick.column] = 1;
    }
    else {
      stacks[num] = -100;
    }
  }

  mia = makeAnimatedSprite("Art/mia_animations.json", "run");
  mia.anchor.set(0.5, 0.9);
  mia.position.set(200, game_height - 40);
  stage.addChild(mia);
  mia.animationSpeed = 0.3;
  mia.play();
  mia.state = "running";
  mia.y_velocity = 0;
}
Instead of starting every column with one brick, we will now leave some columns empty (using -100 to represent a deep pit). Now there are gaps where Mia can fall.
Detail: Which columns? Modular arithmetic! Modular arithmetic!
num % 7 is read as “num mod 7″. Mod means you wrap around, like days of the week, or hours on a clock.
5 mod 7 is 5.
6 mod 7 is 6.
7 mod 7 is 0.
8 mod 7 is 1.
9 mod 7 is 2.
…
14 mod 7 is 0.
15 mod 7 is 1.
In the game, we use mod 16. if (num % 16 < 14) just means “for every 16 things, the first 14 things look like this”, and then you make bricks.
“else”, or “otherwise”, you make no bricks, and just leave a deep pit.
So the last two spots out of every 16 spots are deep pit spots.
Next up, we make sure to reset the game whenever Mia has fallen too far, and make sure updateGame works right when Mia’s state is kaput. Add this code to updateGame:
function updateGame(diff) {

  // Don't try to update the game until we've created Mia,
  // or the game will crash.
  if (mia == null) return;

  dropBricks();

  // If the right key got pushed, move Mia to the right
  if (key_down["ArrowRight"]) {
    mia.last_x = mia.x;
    mia.x = mia.x + 7;
    mia.scale.set(1,1);
    if (mia.state != "kaput") mia.scale.set(1,1);
  }

  // If the left key got pushed, move Mia to the left
  if (key_down["ArrowLeft"]) {
    mia.last_x = mia.x;
    mia.x = mia.x - 7;
    mia.scale.set(-1,1);
    if (mia.state != "kaput") mia.scale.set(-1,1);
  }

  // If the space bar got pushed, make Mia jump
  if (key_down[" "] && mia.state == "running") {
    mia.state = "jumping";
    mia.y_velocity = -20;
  }

  // If Mia is jumping, move her upwards, use gravity to pull her downwards,
  // and if she reaches the ground, stop the jump.
  if (mia.state == "jumping" || mia.state == "falling") {
  if (mia.state == "jumping" || mia.state == "falling" || mia.state == "kaput") {
    mia.y = mia.y + mia.y_velocity;
    mia.y_velocity = mia.y_velocity + 0.8;

    if (mia.y_velocity > 0 && mia.state == "jumping") {
      // switch to falling
      mia.state = "falling";
    }
  }

  testBricks();

  if (mia.y > 1200) {
    stage.removeChildren();
    bricks = [];
    stacks = {};
    initializeGame();
  }

  followMia();
}
When Mia’s y position gets too far below the screen, this code removes everything from the stage, empties the brick list, empties the brick stacks, and calls the initializeGame function, which starts the game over.
Very last for today, add this head bopping code to testBricks:
function testBricks() {

  ...
  ...
  ...

  // Then, loop through the whole brick list
  for (i = 0; i < bricks.length; i += 1) {
    let brick = bricks[i];

    // If a brick is not falling, make sure Mia can't run through it.
    if (brick.y_velocity == 0) {

      // Calculate the floor height of this particular brick
      this_brick_floor_height = game_height - 36 * stacks[brick.column] - 4;
      // If Mia is below this brick's floor height, and she's too close
      // to the brick, push her back out.
      if (Math.abs(mia.x - brick.x) < 90 && mia.y > this_brick_floor_height) {
        if (mia.x < brick.x) mia.x = mia.x - 7;
        if (mia.x > brick.x) mia.x = mia.x + 7;
      }
    }
    else if (brick.y_velocity > 0 && mia.state != "kaput") {
      // If Mia is too close to a falling brick, she goes kaput.
      if (Math.abs(mia.x - brick.x) < 80
        && brick.y < mia.y - 10
        && brick.y > mia.y - 175) {
        mia.state = "kaput";
        mia.scale.y = -1;
        mia.y_velocity = -5;
        mia.y = mia.y - 175;
      }
    }
  }
}
Inside the loop which checks all the bricks, there’s already an if statement to make sure Mia can’t run through a brick that’s stopped.
Below that, we add an else statement; “otherwise, if the brick has y velocity, and Mia isn’t already kaput, do this”.
What we do is check if Mia’s x position is too close to the brick, and if her y position is roughly the same as the brick. In that case, we flip her upside down, set her state to kaput, and give her a tiny upwards bump so the upside down falling animation looks good.
Good job! You’ve got a real game going now.

Tomorrow we’re going to make it juicy.