(Activity time: about 60 minutes)
(Download the Day Six Files here)
Previous posts:
Game Jam Day 1
Game Jam Day 2
Game Jam Day 3
Game Jam Day 4
Game Jam Day 5
Intro
Hello, and welcome to day 6 of the Dad and Daughter Quarantine Game Jam Tutorial!
We’re making a game called Mia’s Daring Escape.
On day 1, we set up the game and put Mia on the screen.
On day 2, we gave Mia a brick level to run, and a jumping skill.
On day 3, we made falling bricks that stacked up on the ground or bopped Mia on the head.
On day 4, we added sounds and effects and gave Mia different poses for jumping and falling and standing still.
On day 5, we made some baddies.
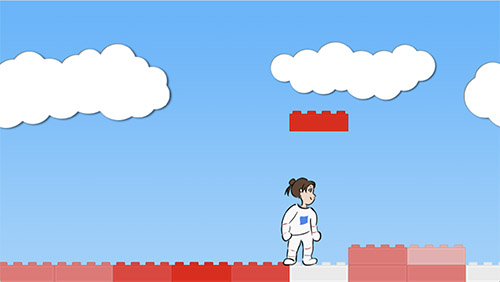
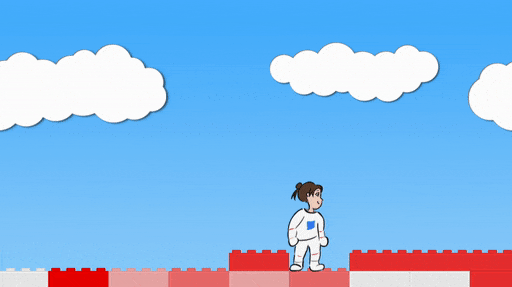
Today we add the rocket. Today, Mia can finally escape!
For the third time, you’re definitely going to have to download the day six files, so you can get the rocket images, the explosion images, and the new plumbing.js, which lets you make explosions.
You can keep the game.js file you’ve been working on, but be sure to add rocket.png, rocket_door.png, explosion.json, and explosion.png to the Art folder, and be sure to swap out plumbing.js, because I’ve added a function for making explosions.
First Task: Minor Edits
Uh, so.
Before we get to the good stuff, I feel like we need to fix a few things.
Mia should get a little bounce when she bops a shako on the head.
When Mia gets hit by a brick, it should trigger the same sound effect as when she gets hit by a shako spear.
And those brick colors. Ech. We need some nicer colors.
Time to fly solo, kid. These edits are your job.
First, we’re going to go to the bottom of the miaVsShakos function, where Mia lands on a shako, and give Mia a little bounce by setting her state to “jumping”, giving her some y velocity, and playing the jump sound effect.
Add this code to miaVsShakos:
if (shako.state != "kaput" && mia.state == "falling") {
  if (Math.abs(mia.x - shako.x) < 80 && mia.y < shako.y - 30 && mia.y > shako.y - 160) {
    if (shako.stance == "up") {
      mia.setState("kaput");
      mia.scale.y = -1;
      mia.y_velocity = -5;
      mia.y = mia.y - 175;
      soundEffect("negative_2");
    } else if (shako.stance == "forward") {
      shako.state = "kaput";
      shako.scale.y = -1;
      shako.y_velocity = -5;
      shako.y = shako.y - 175;
      soundEffect("hurt");

      mia.setState("jumping");
      mia.y_velocity = -10;
      soundEffect("jump_3");
    }
  }
}
Reset the game using Command-R (on Mac) or Ctrl-R (on Windows) and make sure Mia gets a nice bounce when she lands on a shako.
Then, let’s play add negative sound when Mia gets hit by a brick.
Go to the bottom of the testBricks function and add one line for a sound effect:
else if (brick.y_velocity > 0 && mia.state != "kaput") {
  // If Mia is too close to a falling brick, she goes kaput.
  if (Math.abs(mia.x - brick.x) < 80
    && brick.y < mia.y - 10
    && brick.y > mia.y - 175) {
    mia.setState("kaput");
    mia.scale.y = -1;
    mia.y_velocity = -5;
    mia.y = mia.y - 175;
    soundEffect("negative_2");
  }
}
Last, let’s change the brick colors.
Remember that color takes three numbers: a Red number, a Green number, and a Blue number.
I may have forgotten to mention this: all colors on a computer are made by mixing red, green, and blue. The little pixels in your monitor screen are actually little groups of red, green, and blue light, and you control the color by choosing how much of each.
1 = max color
0 = no color
So if you say color(1, 0, 0), that’s max red, no green, no blue.
If you say color(1, 0, 1), that’s max red, no green, max blue, and you actually get pink! You need to turn down the values to get purple.
If you say color (0.5, 0, 0.5), that’s half red, no green, half blue, and that gets you purple.
You get to pick the colors for the bricks, but if you want, I’ve provided you a nice menu of color schemes to pick from. You can copy and paste these into the code.
Here’s your color menu:
// Pastel Color Scheme
color(0.38, 0.68, 1.00),
color(0.94, 0.80, 0.21),
color(1.00, 0.50, 0.05),
color(0.85, 0.12, 0.03),
color(1.00, 0.51, 0.71),
color(0.65, 0.24, 0.65),
color(0.20, 0.70, 0.38),
// Blue brick color scheme
color(0.96, 1.00, 1.00),
color(0.74, 0.94, 1.00),
color(0.42, 0.84, 0.99),
color(0.00, 0.57, 0.78),
color(0.00, 0.84, 0.99),
color(0.00, 0.33, 0.79),
// Pink brick color scheme
color(1.00, 0.96, 1.00),
color(1.00, 0.74, 0.94),
color(0.99, 0.42, 0.84),
color(0.78, 0.00, 0.57),
color(0.99, 0.00, 0.84),
color(0.79, 0.00, 0.33),
// Red brick color scheme
color(0.97, 0.97, 0.97),
color(0.97, 0.72, 0.72),
color(0.97, 0.48, 0.48),
color(0.97, 0.23, 0.23),
color(0.97, 0.00, 0.00),
// Green brick color scheme
color(0.74, 0.90, 0.74),
color(0.64, 0.83, 0.63),
color(0.51, 0.75, 0.52),
color(0.31, 0.56, 0.33),
color(0.17, 0.33, 0.19),
// Desert color scheme
color(0.25, 0.11, 0.18),
color(0.94, 0.63, 0.38),
color(0.95, 0.51, 0.35),
color(0.54, 0.13, 0.12),
color(0.84, 0.24, 0.24),
You can copy and paste the code for whichever colors you want, or make up your own. For the rest of this tutorial, I’m going to use red.
Remove the old colors, and add your colors to the code at the top of the file, like this:
let colors = [
  color(1,0,0), // Red
  color(0,1,0), // Green
  color(0,0,1), // Blue
  // Red brick color scheme
  color(0.97, 0.97, 0.97),
  color(0.97, 0.72, 0.72),
  color(0.97, 0.48, 0.48),
  color(0.97, 0.23, 0.23),
  color(0.97, 0.00, 0.00),
]
There, all the things that needed fixing are fixed.
Second Task: Bigger level, but with boundaries.
Before we add the rocket, we also want to stop Mia from running into the black screen on either side of the level, and we want to make an extra bit of level at the end where the rocket will sit, with no bricks or shakos around.
We’ve set all our code to 70 brick columns, and for the shakos and falling bricks, we can leave it that way.
But we’re going to lengthen the level at the end to 90 columns, and put the rocket somewhere out there at the end.
This one is just a lot of bookkeeping, so I think you can handle it.
First, change these lines at the beginning of the initializeGame function:
function initializeGame() {

  for (num = -1; num < 8; num += 1) {
  for (num = -1; num < 11; num += 1) {
    let blue_sky = makeSprite("Art/blue_sky.png");
    blue_sky.position.set(game_width * num, 0);
    stage.addChild(blue_sky);
  }

  for (num = -8; num < 70; num += 1) {
  for (num = -8; num < 90; num += 1) {

    if (num % 16 < 14) {
      let brick = makeSprite("Art/brick.png");
      brick.anchor.set(0.5,1);
      brick.position.set(120 * num, game_height);
      brick.tint = pick(colors);
      stage.addChild(brick);
      bricks.push(brick);

      brick.column = num;
      brick.y_velocity = 0;
      stacks[brick.column] = 1;
    }
    else {
      stacks[num] = -100;
    }
  }
...
...
...
Next, change this line in the testBricks function:
function testBricks() {

  // Don't test anything if Mia is already kaput
  if (mia.state == "kaput") return;

  mia.column = Math.floor((mia.x + 60) / 120);

  // Don't test bricks if Mia is too far to the left or right.
  if (mia.column < -8 || mia.column >= 70) return;
  if (mia.column < -8 || mia.column >= 90) return;

  // Figure out the floor for Mia's current column.
  let floor_height = game_height - 36 * stacks[mia.column] - 4;

  // First, check if Mia has run into thin air,
  // like Wile E Coyote, and make her fall.
  if (mia.y < floor_height && mia.y_velocity >= 0) {
    mia.setState("falling")
  }
...
...
...
Finally, add some if statements to the updateGame function to stop Mia from going too far left or right:
// If the left key got pushed, move Mia to the left
  if (key_down["ArrowLeft"]) {
    if (mia.state == "idle") mia.setState("running");
    if (mia.x_velocity > 0) {
      mia.x_velocity = 0;
      makeSmoke(stage, mia.x + 20, mia.y - 40, 1.4, 1.4);
    }
    mia.x_velocity -= 1;
    if (mia.x_velocity < -1 * mia.max_x_velocity) mia.x_velocity = -1 * mia.max_x_velocity;
    if (mia.state != "kaput") mia.scale.set(-1,1);
  }

  mia.last_x = mia.x;
  mia.x += mia.x_velocity;
  mia.x_velocity *= 0.93;
  if (mia.state == "running" && Math.abs(mia.x_velocity) < 0.5) mia.setState("idle");

  if (mia.x < 0) mia.x = 0;
  if (mia.x > 84 * 120) mia.x = 84 * 120;

  // If the space bar got pushed, make Mia jump
  if (key_down[" "]) {
    if (mia.state == "running" || mia.state == "idle") {
      mia.setState("jumping");
      mia.y_velocity = -20;
      soundEffect("jump_3");
      makeSmoke(stage, mia.x - 3 * mia.x_velocity, mia.y - 40, 1.4, 1.4);
    }
  }
Whew. Now Mia can’t run off into the black parts of the screen. There’s nothing interesting about this, so I’m not going to show a picture of it.
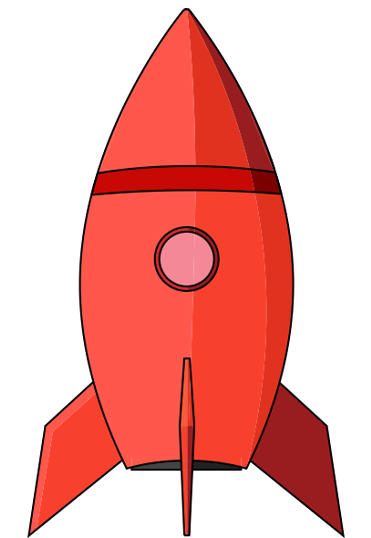
Third Task: Add the rocket!
And now for the main event! We’re going to add the rocket to the game.
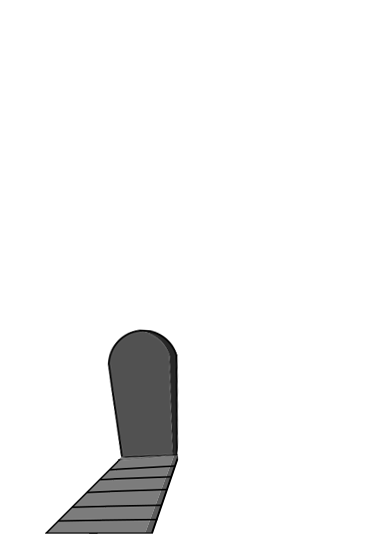
I’ve given you one picture for the rocket, and one matching picture for the door:
The code for this one is actually pretty simple, in the sense that we’ve done all this before a few times.
We have to keep track of the rocket and the door in multiple places, so we’re going to write “let rocket” etc at the top of the code so our variables are available everywhere.
Add this to the beginning of game.js:
...
...
...
let mia = null;
let rocket = null;
let rocket_door = null;
let bricks = [];
let shakos = [];
let stacks = {};
...
...
...
Now add the rocket itself to initializeGame, and put it just before Mia, so that on the stage, Mia’s sprite will show up on top of the rocket sprite:
...
...
...

  rocket = makeSprite("Art/rocket.png");
  rocket.anchor.set(0.5, 1);
  rocket.position.set(9960, game_height - 34);
  rocket.y_velocity = 0;
  rocket.state = "ground";
  stage.addChild(rocket);

  rocket_door = makeSprite("Art/rocket_door.png");
  rocket_door.anchor.set(0.5, 1);
  rocket_door.position.set(9960, game_height - 34);
  stage.addChild(rocket_door);

  mia = makeContainer();

  mia.run = makeAnimatedSprite("Art/mia_animations.json", "run");
  mia.run.anchor.set(0.5, 0.9);
  mia.run.animationSpeed = 0.3;
  mia.run.play();
  mia.addChild(mia.run);

  mia.fall = makeAnimatedSprite("Art/mia_animations.json", "fall");
  mia.fall.anchor.set(0.5, 0.9);
  mia.fall.animationSpeed = 0.3;
  mia.fall.play();
  mia.addChild(mia.fall);

...
...
...
We make a rocket sprite, set a position, give it a state and a velocity, add it to the stage, yada yada yada, the rocket is…
Wait, the rocket is all the way on the other side of the level at x = 9960.
I’m not sure you can beat the game yet. I’m not sure I can beat the game yet! I’m definitely totally sure you don’t want to have to beat the game every time you want to test some code.
Time to go back to that handy dandy debug console! Remember, if you press Command-Option-I on a Mac or Ctrl-Shift-J on Windows, you’ll open up a little side window where you can print information or see any errors. You can press the same keys to close it again. Alternately, you can go to the View menu above and choose “Toggle Developer Tools”.
Do that now, and drag the window a bit larger so you can still see your whole game.

There’s a little prompt where you can type stuff. Click it, and type “mia.x = 8000”. Boom, Mia has been teleported close to the end of the level. You’ll have to click back on the game before you can control it with the keyboard, so do that.
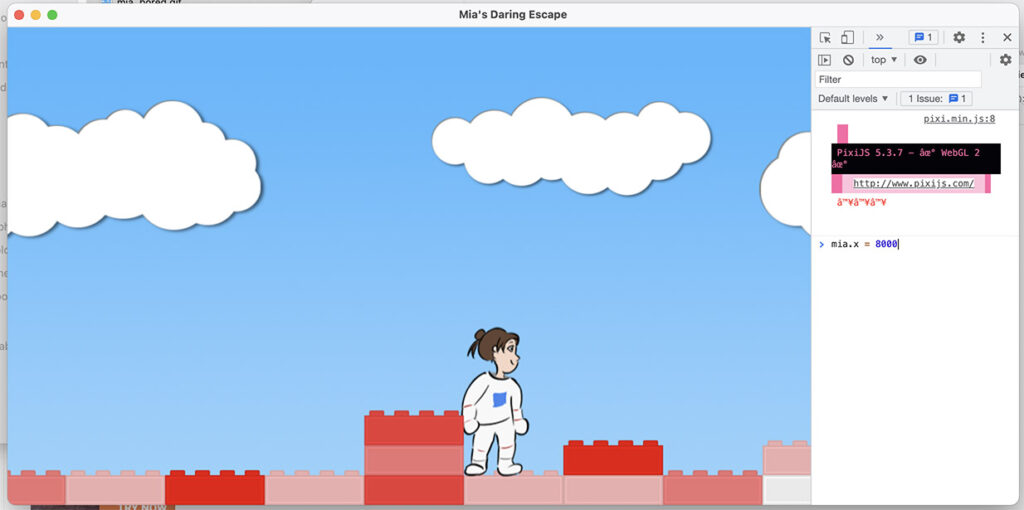
And now, there is a rocket! And you can test it by changing Mia’s position.
Detail: I drew this rocket in Adobe Illustrator following a wonderful tutorial by Spoon Graphics. If you use Illustrator and you want to get good at it, I recommend this channel.
Final Task: LIFTOFF!
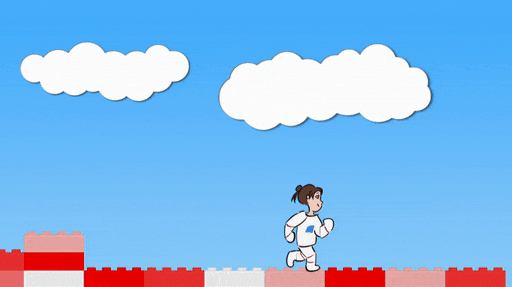
We’re going to make a function called updateRocket, which does exactly what you think it does.
If Mia isn’t dead, and she isn’t already in the rocket, and her x value is larger than the rocket’s x value, we’re going to put her in the rocket. What this actually means is hide Mia, hide the door, set Mia’s state to “rocket”, and play some sound effects.
Then, if Mia is in the rocket, we’re going to shake it, we’re going to make it rise by giving it some y velocity (slow at first, then faster), and we’re going to make a ton of smoke and explosions (using the new makeExplosions function I’ve given you, and the old makeSmoke).
Also, at the veeeery end of updateGame, we’re going to change the reset code so that it resets either if Mia has fallen enough or if the rocket has rise enough. That’s because, for today, we want the game to loop back to the beginning when you finish.
So, add the whole updateRocket function:
function miaVsShakos() {
  ...
  ...
  ...
}


function updateRocket() {
  if (mia.state == "kaput") return;

  if (mia.state != "rocket") {
    if (mia.x > rocket.x) {
      mia.state = "rocket";
      mia.visible = false;
      soundEffect("rocket_2");
      soundEffect("victory_3");
      rocket_door.visible = false;
    }
  }

  if (mia.state == "rocket") {
    // Shake between -2 and 2 pixels both x and y axes.
    rocket.x += -2 + dice(100) / 25;
    rocket.y += -2 + dice(100) / 25;

    // Go up
    rocket.y += rocket.y_velocity;

    // Start slow, then get faster
    if (rocket.y_velocity > -0.1) {
      rocket.y_velocity -= 0.001;
    } else {
      rocket.y_velocity -= 0.05;
    }

    // Make a ton of explosions and smoke near the bottom of the rocket
    for (num = 0; num < 3; num += 1) {
      makeExplosion(stage, rocket.x - 30 + dice(60), rocket.y - 30 - dice(25), 1.4, 1.4);
    }
    for (num = 0; num < 5; num += 1) {
      makeSmoke(stage, rocket.x - 60 + dice(120), rocket.y - 30 - dice(25), 1.4, 1.4);
    }
  }
}

function testBricks() {
  ...
  ...
  ...
}
And finally, make these changes at the bottom of updateGame:
...
...
...

  updateShakos();
  miaVsShakos();
  updateRocket();

  testBricks();

  if (mia.y > 1200) {
  if (mia.y > 1200 || rocket.y < -9000) {
    stage.removeChildren();
    bricks = [];
    shakos = [];
    stacks = {};
    initializeGame();
  }

  followMia();
}
Try it out! Make sure to use the debug console and set Mia’s position to 8000 or so so you can test it easily.
Woohoo!
This is now a complete game. Or is it?! Come back tomorrow for the end screen… and the ray gun.