(Activity time: about 60 minutes)
(Download the Day Seven Files here)
Previous posts:
Game Jam Day 1
Game Jam Day 2
Game Jam Day 3
Game Jam Day 4
Game Jam Day 5
Game Jam Day 6
Intro
Hello, and welcome to the seventh and final day of the Dad and Daughter Quarantine Game Jam Tutorial!
We’re making a game called Mia’s Daring Escape.
On day 1, we set up the game and put Mia on the screen.
On day 2, we gave Mia a brick level to run, and a jumping skill.
On day 3, we made falling bricks that stacked up on the ground or bopped Mia on the head.
On day 4, we added sounds and effects and gave Mia different poses for jumping and falling and standing still.
On day 5, we made some baddies.
On day 6, we made the rocket.
Today, for the finale, we’re going to add the ray gun and the end screen.
For the last time, you’re definitely going to have to download the day seven files, so you can get the ray gun effects, the end screen, and Mia’s new pose.
You can keep the game.js file you’ve been working on, but be sure to replace everything in the Art folder, because I’ve changed Mia’s sprite file, and be sure to swap out plumbing.js, because I’ve added a function for making blast effects.
Also, you’re almost done, guy. You’re doing a great job if you’ve come this far. Just a little further. Your kid will thank you some day.
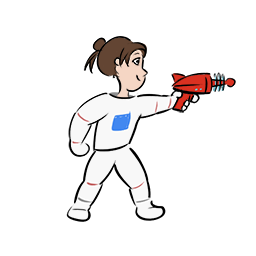
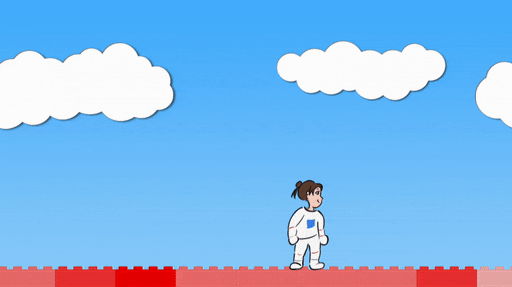
First Task: New State, New Pose!
Mia’s getting a new state called “blasting”, and a new animation pose. Be sure to use the new Mia image file, or this code won’t work.
The blaster pose looks like this:
Let’s start by adding the new sprite to the initializeGame function:
function initializeGame() {

  ...
  ...
  ...

  mia.run = makeAnimatedSprite("Art/mia_animations.json", "run");
  mia.run.anchor.set(0.5, 0.9);
  mia.run.animationSpeed = 0.3;
  mia.run.play();
  mia.addChild(mia.run);

  mia.fall = makeAnimatedSprite("Art/mia_animations.json", "fall");
  mia.fall.anchor.set(0.5, 0.9);
  mia.fall.animationSpeed = 0.3;
  mia.fall.play();
  mia.addChild(mia.fall);

  mia.rise = makeAnimatedSprite("Art/mia_animations.json", "rise");
  mia.rise.anchor.set(0.5, 0.9);
  mia.addChild(mia.rise);

  mia.idle = makeAnimatedSprite("Art/mia_animations.json", "idle");
  mia.idle.anchor.set(0.5, 0.9);
  mia.addChild(mia.idle);

  mia.blasting = makeAnimatedSprite("Art/mia_animations.json", "blasting");
  mia.blasting.anchor.set(0.5, 0.9);
  mia.addChild(mia.blasting);

  // Change mia's state
  mia.setState = function(state) {
    mia.state = state;

    // Set all sprites invisible
    mia.run.visible = false;
    mia.fall.visible = false;
    mia.rise.visible = false;
    mia.idle.visible = false;

    // Then set the right state back to visible
    if (mia.state == "running") mia.run.visible = true;
    if (mia.state == "falling") mia.fall.visible = true;
    if (mia.state == "jumping") mia.rise.visible = true;
    if (mia.state == "idle" || mia.state == "kaput") mia.idle.visible = true;
  }

  mia.position.set(200, game_height - 40);
  mia.setState("idle");
  mia.y_velocity = 0;
  mia.x_velocity = 0;
  mia.max_x_velocity = 8;
  stage.addChild(mia);
}
Whoops. It looks like the new pose is sitting in front of all the other poses.
That’s because we haven’t incorporated it into Mia’s setState function.
Change the setState function like this:
  // Change mia's state
  mia.setState = function(state) {
    mia.state = state;

    // Set all sprites invisible
    mia.run.visible = false;
    mia.fall.visible = false;
    mia.rise.visible = false;
    mia.idle.visible = false;
    mia.blasting.visible = false;

    // Then set the right state back to visible
    if (mia.state == "running") mia.run.visible = true;
    if (mia.state == "falling") mia.fall.visible = true;
    if (mia.state == "jumping") mia.rise.visible = true;
    if (mia.state == "blasting") mia.blasting.visible = true;
    if (mia.state == "idle" || mia.state == "kaput") mia.idle.visible = true;
  }
There. Now that setState accounts for the new blasting pose, it no longer sits on top of everything else.
Now we need a way to trigger the pose.
First, let’s give Mia an extra property called last_blast to keep the time that she last fired the blaster.
Add this one line of code at the very bottom of initializeGame:
  mia.position.set(200, game_height - 40);
  mia.setState("idle");
  mia.y_velocity = 0;
  mia.x_velocity = 0;
  mia.max_x_velocity = 8;
  mia.last_blast = Date.now();
  stage.addChild(mia);
Now we need to do a lot of little bits of bookkeeping to make sure the new state doesn’t break the old program.
Change this line in miaVsShakos:
function miaVsShakos() {
  for (shako_num = 0; shako_num < shakos.length; shako_num += 1) {
    let shako = shakos[shako_num];

    if (shako.state != "kaput" && mia.state == "running") {
    if (shako.state != "kaput" && ["running","jumping","blasting"].includes(mia.state)) {

      if (mia.x < shako.x && mia.scale.x == 1 && shako.scale.x == 1 && mia.x > shako.x - 80
        && shako.stance == "forward" && Math.abs(mia.y - shako.y) < 100) {
        mia.setState("kaput");
        mia.scale.y = -1;
        mia.y_velocity = -5;
        mia.y = mia.y - 175;
        soundEffect("negative_2");
      }
...
...
...
Remember, there’s one set of things that happens if Mia is falling onto the shako heads, and another if Mia is running.
We want that running code to trigger if Mia is running, or blasting, or even jumping (that is, the upward half of her jump, before she starts falling).
Let’s do something similar in updateGame:
  // If the right key got pushed, move Mia to the right
  if (key_down["ArrowRight"]) {
    if (mia.state == "idle") mia.setState("running");
    if (mia.state == "idle" || mia.state == "blasting") mia.setState("running");
    if (mia.x_velocity < 0) {
      mia.x_velocity = 0;
      makeSmoke(stage, mia.x - 20, mia.y - 40, 1.4, 1.4);
    }
    mia.x_velocity += 1;
    if (mia.x_velocity > mia.max_x_velocity) mia.x_velocity = mia.max_x_velocity;
    if (mia.state != "kaput") mia.scale.set(1,1);
  }

  // If the left key got pushed, move Mia to the left
  if (key_down["ArrowLeft"]) {
    if (mia.state == "idle") mia.setState("running");
    if (mia.state == "idle" || mia.state == "blasting") mia.setState("running");
    if (mia.x_velocity > 0) {
      mia.x_velocity = 0;
      makeSmoke(stage, mia.x + 20, mia.y - 40, 1.4, 1.4);
    }
    mia.x_velocity -= 1;
    if (mia.x_velocity < -1 * mia.max_x_velocity) mia.x_velocity = -1 * mia.max_x_velocity;
    if (mia.state != "kaput") mia.scale.set(-1,1);
  }

  mia.last_x = mia.x;
  mia.x += mia.x_velocity;
  mia.x_velocity *= 0.93;
  if (mia.state == "running" && Math.abs(mia.x_velocity) < 0.5) mia.setState("idle");

  if (mia.x < 0) mia.x = 0;
  if (mia.x > 84 * 120) mia.x = 84 * 120;

  // If the space bar got pushed, make Mia jump
  if (key_down[" "]) {
    if (mia.state == "running" || mia.state == "idle") {
    if (mia.state == "running" || mia.state == "idle" || mia.state == "blasting") {
      mia.setState("jumping");
      mia.y_velocity = -20;
      soundEffect("jump_3");
      makeSmoke(stage, mia.x - 3 * mia.x_velocity, mia.y - 40, 1.4, 1.4);
    }
  }
Mia should be able to take off running from both the idle state and the blasting state.
Also, she should be able to jump from the running, idle, and blasting states.
Now we’re ready to write the actual blaster action. Put this in at the end of updateGame:
  mia.last_x = mia.x;
  mia.x += mia.x_velocity;
  mia.x_velocity *= 0.93;
  if (mia.state == "running" && Math.abs(mia.x_velocity) < 0.5) mia.setState("idle");

  if (mia.x < 0) mia.x = 0;
  if (mia.x > 84 * 120) mia.x = 84 * 120;

  // If the space bar got pushed, make Mia jump
  if (key_down[" "]) {
    if (mia.state == "running" || mia.state == "idle" || mia.state == "blasting") {
      mia.setState("jumping");
      mia.y_velocity = -20;
      soundEffect("jump_3");
      makeSmoke(stage, mia.x - 3 * mia.x_velocity, mia.y - 40, 1.4, 1.4);
    }
  }

  if (key_down["Enter"] || key_down["v"] || key_down["b"]) {
    if (["running", "idle"].includes(mia.state) && Date.now() - mia.last_blast > 300) {
      mia.setState("blasting");
      mia.last_blast = Date.now();
      mia.x += -5 * mia.scale.x;
    }
  }

  if (mia.state == "blasting" && Date.now() - mia.last_blast > 300) {
    mia.setState("idle");
  }
If the player presses the Enter key, or the v key, or the b key, the blaster action will trigger, but only if Mia is either idle or running (not jumping, falling, or kaput), and only if the time since her last blast is greater than 300 milliseconds (“Date.now() – mia.last_blast > 300“).
For now, we just change Mia’s state so she makes the blaster pose, and we set the last blast to right now, and we move her back a few pixels.
The second if statement checks if Mia is in the blasting state and has been there for 300 milliseconds, in which case, she is returned to idle.
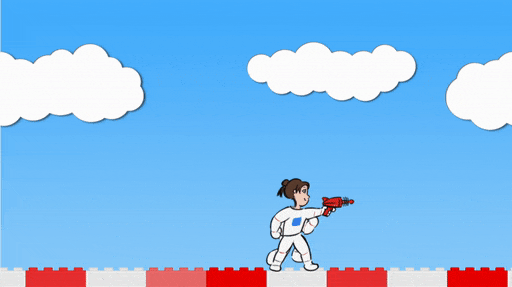
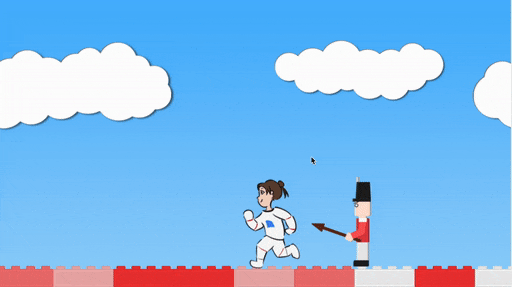
Second Task: The Blaster Actually Fires!
Let’s make some blasts.
Blaster is your job.
I’ve given you a convenient new function called makeBlastEnergy. It’s similar to makeSmoke and makeExplosion: you give it a position and a scale, and it just automatically makes a nice animated effect.
There’s also a new blast animated sprite.
Also, you can color both of these.
Let’s add to the blaster code at the end of the updateGame function:
if (key_down["Enter"] || key_down["v"] || key_down["b"]) {
    if (["running", "idle"].includes(mia.state) && Date.now() - mia.last_blast > 300) {
      mia.setState("blasting");
      mia.last_blast = Date.now();
      mia.x += -5 * mia.scale.x;
      soundEffect("jump_4");
      makeBlastEnergy(stage, color(0,0,1), mia.x + 124 * mia.scale.x, mia.y - 138, 0.75, 0.75);

      let blast = makeAnimatedSprite("Art/blast.json", "blast");
      blast.scale.set(2,2);
      blast.tint = color(0,0,1);
      blast.position.set(mia.x + 124 * mia.scale.x, mia.y - 134);
      blast.animationSpeed = 0.3;
      blast.state = "active";
      blast.direction = mia.scale.x;
      blast.x_velocity = 20 * blast.direction;
      blast.original_x = blast.x;
      blast.play();
      stage.addChild(blast);
    }
  }
First, we make a sound effect for the blaster by calling the soundEffect function. I like “jump_4” as a blaster sound, but you should pick one for yourself.
Then, we call the makeBlastEnergy function with some coordinates that are close to Mia. I’ve picked out ones that are close to the actual position of her blaster, but you can experiment with these numbers.
Notice also that makeBlastEnergy takes a color. I chose color(0, 0, 1), which is total blue, but you can pick your own.
Then, we make an animated sprite called blast.
We set its scale to 2,2, which means double the size x and double the size y, because it’s a darned small picture.
We set its position to almost the same place as the blaster.
I’ve chosen to set the tint of the blast to color(0, 0, 1) to match the blast energy, but you can pick your own and it doesn’t have to match the energy.
Heck, if you want to get really clever, write:
blast.tint = color( dice(100) / 100, dice(100) / 100, dice(100) / 100)
That will set the blast to a random color every time!
We give the blast some velocity in the right direction, which is based on Mia’s scale (1 is facing right, -1 is facing left).
Finally, we start the animation playing, and add the blast to the stage.
It’s not going to move yet. It’s just going to hover in place, weirdo style.
To make the blasts move, we’re going to do the same pattern we did with bricks and shakos.
We’re going to make a list of blasts, add each new blast to the list, and update all the blasts every frame.
Start by adding the list at the very top of the code, and putting the new blast into the list at the very bottom, and clearing blasts when we reset the game:
let mia = null;
let rocket = null;
let rocket_door = null;
let bricks = [];
let shakos = [];
let stacks = {};
let blasts = [];
let colors = [
  // Red brick color scheme
  color(0.97, 0.97, 0.97),
  color(0.97, 0.72, 0.72),
  color(0.97, 0.48, 0.48),
  color(0.97, 0.23, 0.23),
  color(0.97, 0.00, 0.00),
]

...
...
... very many lines ...
...
...

  if (key_down["Enter"] || key_down["v"] || key_down["b"]) {
    if (["running", "idle"].includes(mia.state) && Date.now() - mia.last_blast > 300) {
      mia.setState("blasting");
      mia.last_blast = Date.now();
      mia.x += -5 * mia.scale.x;
      soundEffect("jump_4");
      makeBlastEnergy(stage, color(0,0,1), mia.x + 124 * mia.scale.x, mia.y - 138, 0.75, 0.75);

      let blast = makeAnimatedSprite("Art/blast.json", "blast");
      blast.scale.set(2,2);
      blast.tint = color(0,0,1);
      blast.position.set(mia.x + 124 * mia.scale.x, mia.y - 134);
      blast.animationSpeed = 0.3;
      blast.state = "active";
      blast.direction = mia.scale.x;
      blast.x_velocity = 20 * blast.direction;
      blast.original_x = blast.x;
      blast.play();
      stage.addChild(blast);
      blasts.push(blast);
    }
  }

...
...
...

if (mia.y > 1200 || rocket.y < -9000) {
    stage.removeChildren();
    bricks = [];
    shakos = [];
    stacks = {};
    blasts = [];
    initializeGame();
  }
Now add an empty function called updateBlasts and call it from the bottom of updateGame:
function updateBlasts() {
}
function updateShakos() {
...
...
...
}
...
...
...
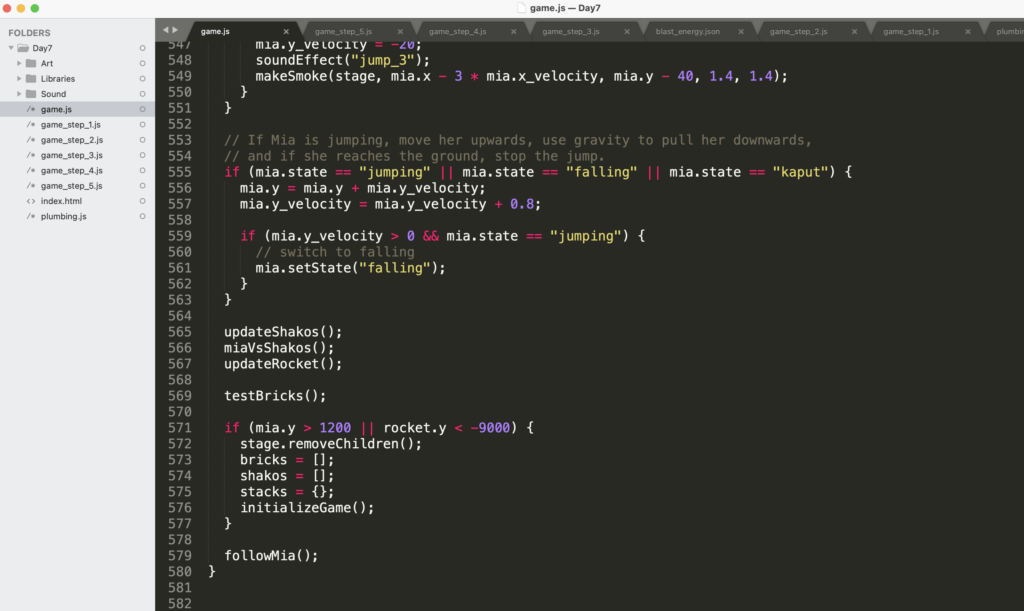
// If Mia is jumping, move her upwards, use gravity to pull her downwards,
// and if she reaches the ground, stop the jump.
if (mia.state == "jumping" || mia.state == "falling" || mia.state == "kaput") {
mia.y = mia.y + mia.y_velocity;
mia.y_velocity = mia.y_velocity + 0.8;
if (mia.y_velocity > 0 && mia.state == "jumping") {
// switch to falling
mia.setState("falling");
}
}
updateBlasts();
updateShakos();
miaVsShakos();
updateRocket();
testBricks();
Inside the updateBlasts function, we’re going to do one loop where we move every blast by that blast’s x velocity.
Then we’re going to do a second loop (in reverse) where we delete any blasts that are done or have moved far away from where they started.
Don’t worry about understanding all of this. It’s good experience just to write it out and see that it works. If you keep doing game programming, you’ll gradually come to understand all the bits and pieces.
function updateBlasts() {
for (blast_num = 0; blast_num < blasts.length; blast_num += 1) {
let blast = blasts[blast_num];
blast.x = blast.x + blast.x_velocity;
}
for (blast_num = blasts.length - 1; blast_num >= 0; blast_num += -1) {
let blast = blasts[blast_num];
if (blast.state == "done" || blast.x > blast.original_x + 900 || blast.x < -1000) {
blasts.splice(blast_num, 1);
stage.removeChild(blast);
}
}
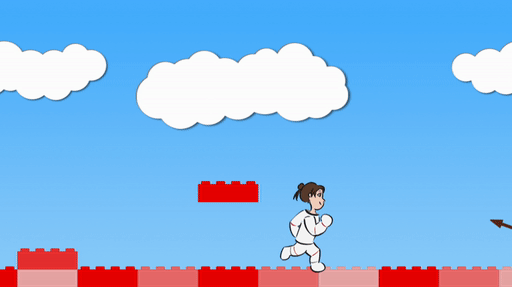
}We have a working blaster! Except… it passes through shakos instead of getting them. We’re going to have to fix that next.
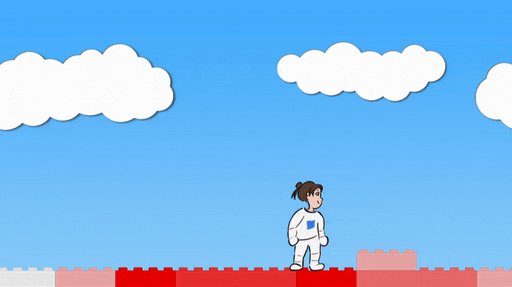
Third Task: Get Those Shakos!
We’ve done code to check collisions before. This is no different. Add the following to updateBlasts:
function updateBlasts() {

  for (blast_num = 0; blast_num < blasts.length; blast_num += 1) {
    let blast = blasts[blast_num];

    blast.x = blast.x + blast.x_velocity;

    for (shako_num = 0; shako_num < shakos.length; shako_num += 1) {
      let shako = shakos[shako_num];

      if (Math.abs(blast.x - shako.x) < 60
        && blast.y > shako.y - 170
        && blast.y < shako.y
        && shako.state != "kaput") {

        shako.state = "kaput";
        shako.scale.y = -1;
        shako.y_velocity = -5;
        shako.y = shako.y - 175;
        if (Math.abs(mia.x - shako.x) < 700) soundEffect("hurt");

        blast.state = "done";
        blast.visible = false;
        makeBlastEnergy(stage, color(0,0,1), blast.x, blast.y, 0.75, 0.75);
      }
    }
  }


  for (blast_num = blasts.length - 1; blast_num >= 0; blast_num += -1) {
    let blast = blasts[blast_num];

    if (blast.state == "done" || blast.x > blast.original_x + 900 || blast.x < -1000) {
      blasts.splice(blast_num, 1);
      stage.removeChild(blast);
    }
  }
}
Inside the loop for every blast, we do a loop that checks every shako.
If the shako and the blast are close to each other on the x axis (“Math.abs(blast.x – shako.x) < 60″) and the blast is between the shako’s feet and head on the y axis, and the shako isn’t kaput, then we have a collision.
We make the shako kaput the same as we’ve done before, giving it some y velocity and turning it upside down and stuff. If Mia is nearby, we play the shako kaput sound.
We also set this blast to done so it will be recycled during the loop at the end of the function, and we make it invisible for good measure.
Finally, we make another blast energy effect at the source of the collision.
Final Task: Final Screen!
No, seriously, this is it. This is the last thing to do.
We’re going to give the game an end screen. I’ve made one for you, called victory_screen. I based it off of this nice stock photo by Cheremuha.
Hey, y’all, you’ve almost climbed a whole mountain together.
First, add this to the start of updateGame:
function updateGame(diff) {

  // Don't try to update the game until we've created Mia,
  // or the game will crash.
  if (mia == null) return;

  if (mia.state == "victory") {
    stage.x = 0;

    if (key_down["Enter"]) {
      stage.removeChildren();
      bricks = [];
      shakos = [];
      stacks = {};
      blasts = [];
      initializeGame();
    }

    return;
  }

  dropBricks();

...
...
...
We’re going to set a “victory” state for Mia. If we find ourselves in this state, first, make sure the stage x coordinate is set to 0, instead of, say, 9536.
Then, check to see if the player has pressed enter. If so, reset all the lists and dictionaries and reset the game.
Finally, return. That word means “quit out of this function”. We want to return here instead of doing all the other stuff, because on the victory screen, all that other stuff is wrong.
We also have to make sure the player can’t move Mia around while the rocket is moving, so make these changes later in updateGame to prevent left and right (jump is already only allowed on specific states, so we can ignore it):
// If the right key got pushed, move Mia to the right
  if (key_down["ArrowRight"]) {
  if (mia.state != "rocket" && key_down["ArrowRight"]) {
    if (mia.state == "idle" || mia.state == "blasting") mia.setState("running");
    if (mia.x_velocity < 0) {
      mia.x_velocity = 0;
      makeSmoke(stage, mia.x - 20, mia.y - 40, 1.4, 1.4);
    }
    mia.x_velocity += 1;
    if (mia.x_velocity > mia.max_x_velocity) mia.x_velocity = mia.max_x_velocity;
    if (mia.state != "kaput") mia.scale.set(1,1);
  }

  // If the left key got pushed, move Mia to the left
  if (key_down["ArrowLeft"]) {
  if (mia.state != "rocket" && key_down["ArrowLeft"]) {
    if (mia.state == "idle" || mia.state == "blasting") mia.setState("running");
    if (mia.x_velocity > 0) {
      mia.x_velocity = 0;
      makeSmoke(stage, mia.x + 20, mia.y - 40, 1.4, 1.4);
    }
    mia.x_velocity -= 1;
    if (mia.x_velocity < -1 * mia.max_x_velocity) mia.x_velocity = -1 * mia.max_x_velocity;
    if (mia.state != "kaput") mia.scale.set(-1,1);
  }
Whew.
Last thing.
The game reset code at the end of updateGame currently happens if Mia falls too low or the rocket rises too high. The rocket rising needs to trigger something else instead:
...
...
...

  if (mia.y > 1200 || rocket.y < -9000) {
  if (mia.y > 1200) {
    stage.removeChildren();
    bricks = [];
    shakos = [];
    stacks = {};
    blasts = [];
    initializeGame();
  }

  if (rocket.y < -4500) {
    if (mia.state == "rocket") {
      mia.state = "victory";

      let victory_screen = makeSprite("Art/victory_screen.png");
      victory_screen.position.set(0, 0);
      stage.addChild(victory_screen);
    }
  }

...
...
...
It’s just a simple matter of changing Mia’s state to victory, and then pasting a victory screen on top of everything.
But it looks really nice:
You
Are
DONE!
Congratulations! You’ve climbed the mountain, and you’ve done it together! You made a game!
Now go make another one 🙂
<3 Matthew Carlin
Postscript 1: Game Mod Ideas
Here are some ideas for extending or modifying Mia’s Daring Escape:
- Mia’s jump breaks the bricks
- Ray gun breaks the bricks
- Second type of enemy (see postscript 2 for some nice sprite files)
- Some kind of powerup for Mia (like a better jump, or a brick busting tool, or a jump that busts bricks)
- TWO PLAYERS AT ONCE (using two copies of Mia with different keyboard controls)
- A different level, not bricks
Postscript 2: Resources for future Game Programmers
Here are a bunch of things, loosely organized by category.
Programming Languages and Editors
- Python is the programming language of math and science, it’s good for making fast prototypes, and it’s one of the easiest languages to learn. You can do game programming in python with pygame, but it’s not the best way.
- Javascript is what you’ve been doing in this tutorial. It’s the language of the web. This tutorial has used Pixi.JS behind the scenes. Personally I like javascript and Pixi a lot, and after years of professional mathy programming in a number of languages, I’ve chosen javascript and Pixi as my go-to tools for making games. Using electron and a bit of elbow grease, you can make full applications that run on any computer or device, instead of on websites.
- Don’t learn Java. It’s not a great idea.
- Learn C# instead if you’re using a Windows machine. It has flaws, but it also has very strong application building features, and the Visual Studio tool is the best heavyweight editor for writing programs.
- Speaking of editors, Sublime Text is the best lightweight one, and other than periodically asking for your support, it’s free! If you haven’t used it, this is what code looks like in Sublime:
Visual Studio is similar, except it’s a beast and a memory hog and it has hundreds of little magic conveniences that tell you how your own code works and when you’re making mistakes and where to find things you’ve lost.
Free or Nearly Free Game Programming Tools
- Pixelator turns images into pixelated images. It’s magical.
- Texture Packer turns multiple images into one animated sprite sheet, and gives you a nice json file which lets your program understand the sheet and animate things. Use the free version; you don’t need the features in the paid version.
- Inkscape is maybe the best free drawing program.
- Audacity lets you record and edit sounds. It’s great for turning a sound into a different sound.
- LeoCad is a free lego building/drawing program. It’s not really game programming, but I wanted to let you know about it because IT’S A FREE LEGO BUILDING/DRAWING PROGRAM, and also because if you’re creative, you can actually use it to draw game objects.
- I haven’t tried PyxelEdit, but it’s supposed to be very good.
- Here are one hojillion 2d sprite art tutorials, presented as cute gifs.
- ezgif.com is an incredible free site for making gifs out of videos. I did all the Mia gifs with it.
- If you’re on a Mac, Quicktime comes with your machine, and you can open it and choose “New Screen Recording” from the file menu and it will record your screen or part of your screen and make a video of your game.
- Unity sucks.
- Github is the standard way to keep different versions of your project. For instance, Mia’s Daring Escape.
- Godot is the hot new game engine for when you get good and you want to make something professional. It’s like Unity but not sucky.
- Here’s a guide to all the tools and tutorials you can use to make art for a game. Very useful if you want to know your options.
- Here’s a big list of tools.
- Youtube has so many GOOD game programming tutorials.
Not Free, Still Really Good
- Asesprite is a good 2d sprite editor. It’s something like $20. Get this if you want to make retro 2d games, SNES style, etc.
- Adobe Photoshop is $20 a month. That can add up, but it can also be pretty cheap if you just want to do a targeted project.
- Adobe Illustrator is the same. Apparently students can get both for $20 a month.
- Photoshop and Illustrator do different kinds of art. I drew Mia in Photoshop, and the shakos and bricks in Illustrator.
- FL Studio is an amazing music making tool for $99, but honestly music is everywhere now, and you should just use cheap or free music tracks in your project.
- Drawing tablets aren’t cheap, but at $129, they’re no longer totally unaffordable.
- Spine does 2d character animation. It’s $69 for the basic version. You can use it to make cartoons, for real.
Cheap or Free Art and Music for your projects
- freesound.org is amazing. It has free sounds. Be sure to check the licenses! Some you need to credit, some you can just use, some you can’t use commercially, etc.
- opengameart.org has free art. It’s okay for art. Does have some nice music.
- splice.com will give you professional grade sound effects, tons and tons and tons of them, but it costs $10 a month. Maybe you and a friend can pool and share it ^_^
- itch.io doesn’t just have games, it has game assets, both free and paid. I found the Free Knight that I used as a template for Mia on itch.
- gamedevmarket has some good stuff.
- pond5.com has good sound effects, typically costing around $3 or $5 apiece. Good for when you really need that goat sound and you can’t find it anywhere for free.
- Similarly, gamedevelopersstudio.com has lots of cheap $3 and $5 art packs. I got most of the little smoke and explosion type effects from a single pack on that site.
- People on Reddit’s r/gamedev community frequently post free assets (art and music and 3d models and stuff) and you can find a lot of them through a google search.
- https://www.1001freefonts.com/
- AbstractionMusic makes a loooot of royalty free music you can use. Some of Mia’s music tracks are from Abstraction.
- I’m going to plug itch again: itch.io’s selection of chiptune (ie retro) music is great.
- You can actually get pretty far by searching google for “royalty free music” and “royalty free sprites” etc, although you’ll have to wade through some sites that want you to buy stuff.
- Kenney.nl has a lot of excellent free 2d and 3d stuff.
- HEY! You can use the assets from Mia’s Daring Escape whenever you want, wherever you want. (But if you’re using the music files, you have to give credit to the original authors).
- Also, you can use art or code or anything you want from my old bugsby.net game, which I’ve packaged here.
Hopefully that’s enough to get you started on your journey.
Please feel free to leave comments on this blog, or email matt dot carlin at alphazoollc.com. I don’t always have time, but I am always happy to help.